I have recently brought out my beading loom, it has been awhile since I used it. Here is the first project on it.
Showing posts with label beads. Show all posts
Monday, May 12, 2014
Sunday, December 15, 2013
Snowmen Ornaments
This weekend it was craft time with Katie again. She chose to make these bead snowman ornaments.
The kits came with the standard beads and pipe cleaners. Katie put the beads on on and I used hot glue after each bead. The last step was to tie the ribbon scarf around the neck.
Thursday, November 28, 2013
Getting Christmas Started
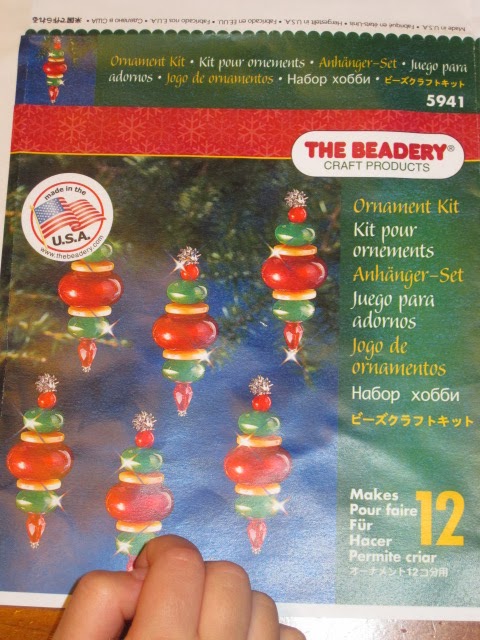
It may be Thanksgiving but after a long day of cooking the was right to start with some Christmas crafts. A few months ago Katie, my Mom and I picked out some Christmas crafts from Mary Maxim. Tonight we started with a simple ornament, here is the package.
It contained silver pipe cleaners and beads. We were quickly able to set it up and Katie followed the graphic to put the beads in the correct order.
We did run out of pipe cleaners so I substituted a yellow from from our craft supplies.
Cute and easy to make, what more can you ask for!
Saturday, August 03, 2013
Candy Corn Pumpkins
Have you ever seen a beaded banner? I made one several years ago for Christmas, a few years ago I bought one that was Halloween themed. While on vacation a few weeks ago I decided to finally make it. Katie is finally old enough that I can work on something and leave it sitting out without worry. The kit I had was from The Beadery and called Candy Corn Pumpkins. I purchased mine from the online craft super store Mary Maxim, banners are available for just about every holiday you could imagine.
The kits come with all the supplies you need. There is a real size pattern that you tape down and construct on top of. Here is a look at the completed banner and the pattern
And a closer look at the completed banner, bring on Halloween!
Friday, December 21, 2012
Rainbow Party
When discussing her birthday about a month ago Katie said she wanted a rainbow cake, not the awesome seven layer cake where each layer is a different color but one with a rainbow on it. I thought this was a good idea and so we went with it. I browsed Etsy and Pinterest for rainbow ideas. I was still considering throwing a large party and found some great ideas. In the end I decided to go small. Grandma, Papa, Uncle and their doggies were invited for Katie's 4th Birthday Rainbow Party.
One item I saw in my research was a rainbow twirl dress. It is a dress with the ROYGBIV colors in each layer down the dress. I thought this would be pretty easy to do. We looked and found Simplicity pattern 2377 which was the closest I could find. I figured I could break the two ruffled layers into as many as needed. When we went to pick fabric we found some new broadcloth fabrics with built in sparkles. The fabric looks like it has glitter in it but it doesn't fall off, it was perfect. My mother helped with the gathering but other than that I actually made a dress! It is a size 5 so is a little big but she has some room to grow into it.
Katie loved the dress and wore it all day. She got many complements and we were even asked where we got it.
For decorations I found a few rainbow things at Party City like these hanging flower like things.
Inspired by what I saw online I decided to make bunting. I got the rainbow colors of felt and added pink. My brother cut them into triangles then I used bias tape to sew them together.
It is a great reusable decoration and it came together really quick and easy
You can also see the rainbow streamers I found at Party City. They were pretty awesome and made the picking of streamers much easier.
Of course we had to have balloons, lots of ballons.
I asked my mom to make a few things as well. She made this rainbow scarf which Katie wants to wear in the snow. She also bought rainbow beads and made a matching necklace and bracelet for Katie which I did not get a photo of. With the leftover yarn she is now working on a rainbow blanket.
Katie's original idea for a rainbow cake changed at the last minute, like I am getting ready to pour the cake in the pan last minute. She changed to wanting dots on a cake, no rainbow.
I made a plain rectangle cake and used Wilton's basic buttercream icing to decorate it. First I frosted it white then had Katie choose four colors for spots. Katie picked yellow, pink, red and violet. She was pretty happy with the results.
The cake was chocolate and accompanied by none other than chocolate ice cream. BTW you can see the rainbow bead necklace in this photo.
I can't believe my baby is 4! It seems like just yesterday I was holding this:
Saturday, October 25, 2008
Ladybug Hair Ribbons
Ladybugs! That is the theme I selected for my upcoming baby shower. Turns out its a little more challenging to find ladybug stuff in the fall but that is ok. One thing my Mom wanted was some hair bows for my cousins daughters. She got the supplies and turned it over to me to see what I could make.
The ribbon was an adorable green with pink ladybugs. There are also two sized of hair clips.

Now I thought starting off that I would just need this things and some glue. However I ended up pulling out wire and the hot glue gun. Eventually I was able to make a bow with 24 gauge wire that I was pretty satisfied with.

Next I decided I needed to cover the hair clip since the bow would not cover the whole thing. I used hot glue for this.

The next step was to attach the bows to the covered hair clips, again it was all about the hot glue gun.

I knew that the bows still needed something more so I dug into my beads and found some that added a little something to the bows giving us the finished product.
The ribbon was an adorable green with pink ladybugs. There are also two sized of hair clips.
Now I thought starting off that I would just need this things and some glue. However I ended up pulling out wire and the hot glue gun. Eventually I was able to make a bow with 24 gauge wire that I was pretty satisfied with.
Next I decided I needed to cover the hair clip since the bow would not cover the whole thing. I used hot glue for this.
The next step was to attach the bows to the covered hair clips, again it was all about the hot glue gun.
I knew that the bows still needed something more so I dug into my beads and found some that added a little something to the bows giving us the finished product.
Monday, July 14, 2008
4th of July Bracelets
My Mom purchased some 4th of July bead so I could make bracelets for her, my cousin and her two kids.
Here are the supplies and the beads getting ready.

And the finished product...
Here are the supplies and the beads getting ready.
And the finished product...
Tuesday, May 29, 2007
Crafty Weekend
I have decided to begin putting my craft projects here, rather than continue to fill the side here with too many links.
First of all I took a two day class to learn how to crochet, our goal was to make a purse. I struggled to get this done for the week between classes, on the drive back to Palmdale I fiendishly crocheted and got all 16 inches done. Here is the result

And then with the joy of finally finishing that project I made a few more things.
Here is a domino bracelet

A pink mahjong tile bracelet

And finally a beaded bracelet
First of all I took a two day class to learn how to crochet, our goal was to make a purse. I struggled to get this done for the week between classes, on the drive back to Palmdale I fiendishly crocheted and got all 16 inches done. Here is the result
And then with the joy of finally finishing that project I made a few more things.
Here is a domino bracelet
A pink mahjong tile bracelet
And finally a beaded bracelet
Subscribe to:
Posts (Atom)